




Celery
Grow
Apium graveolens, ‘Smallage’
Celery certainly looks good in a bed with its tall plume of lush leaves and it can be fun wrapping stems in newspaper/cardboard to help them grow sweet and tender. Since times of ancient Greece and Rome Celery seed has been hailed as a source of a great many health benefits such as improved digestion, reduced rheumatic inflammation and improved liver function to name but a few. Celery is low in carbohydrates and calories and high in potassium – so good for the heart and muscles. Celery naturally grows in damp coastal soils in Europe where it developed as a wild member of the carrot family.
‘Blanching’ your celery – protecting the stems from exposure to the sun – helps to produce pale and sweetly-flavoured stems that will be tender as well as delicious. These days this job is largely done for us with the development of ‘self-blanching’ varieties.
In a nutshell
- Cool conditions
- Rich free draining soil
- Constant moisture
- Long growing season
- Eat raw or cooked
Quantity
1 plant per person
Companions
- Most Brassicas
- Beans
- Tomatoes
- Leeks

The growing lifecycle

Celery seedlings sown into a tray of 'cells'

Punnets of Celery seedlings ready for planting out in the garden

Planting a Celery seedling into well-prepared

Celery seedlings starting to grow and put on foliage

Young Celery seedlings in weed-free mulched soil

Celery seedlings maturing well with a good bunch of leaf stems
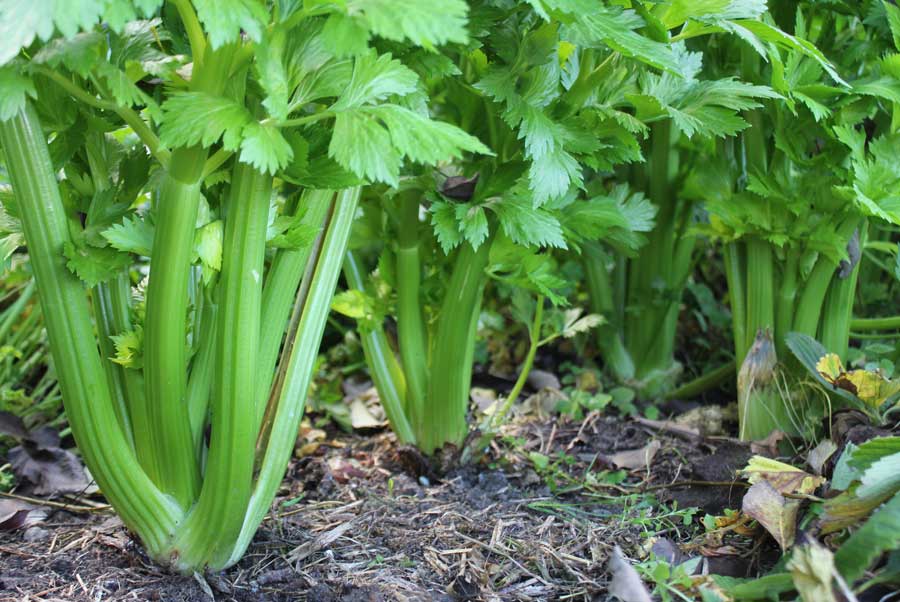
Celery stems showing well, these plants are ready for harvest
A Celery forest...
Top 3 varieties
1. Loretta
A reliable self-blanching variety that grows up to a good forearm-length in height – try fitting that in your lunchbox! Ready for harvest in about 4 months.
2. Green Utah
Mid-green stems with good flavour. Disease resistant and needs no blanching.
3. Tango
Produces fresh green, elegant stems with good bolting tolerance. Grows well in poly-tunnels and greenhouses.
Getting started
When
Sow between March and early April. Use seed trays and transplant when the seedlings are large enough to be handled.
Where
Celery likes a coolish spot with sun morning and afternoon – this might make it sound a bit pedantic but really this just means some shelter from full-on midday sun. It takes about three to four months to mature and ends up fairly bushy so plan to give it adequate space.
Soil
Those multiple stiff stems don’t grow without a good diet and plenty of moisture. You are looking to add spades full (about one per forearm by forearm square) of well-rotted horse manure or kitchen/garden compost to a soil that is already well-dug through. I even dig out a spade-deep hole for each plant and half fill with compost, manure – and the like – as a kind of subterranean ‘goodie store’ waiting for when the plants turn into big, hungry teenagers. Mark the position of each of these ‘goodie stores’ – which should be about a spade’s blade apart – so you can remember to put your seedlings in the right place. Generally it helps to plan for two rows of celery – about a full arm-length apart. This helps produce tender stems as the plants shade each other side-by-side whilst the sun gets to the mop of foliage above.
Sow & plant
Sow & Plant
You can grow celery from seed but be patient because germination can take some time. Transplant seedlings when they have several pairs of leaves and are able to be handled. Plant into individual punnets and allow to grow on indoors until May/June. Before you do plant out ensure you harden seedlings off by placing in a cold frame where you can open the lid during the day and close overnight to prevent any shocks that might lead to bolting further down the line. Personally I don’t generally bother sowing from seed because it can take a while before resulting seedlings are garden-ready. The few pounds you’ll spend on a punnet of seedlings are, in my view and certainly in the case of Celery, comparatively worthwhile and you can plant them once the days are well above ten degrees and all risk of frosts in your area has passed. Seedlings are also mostly self-blanching varieties (this means the stems are naturally tender and not stringy).You want to pop your seedlings into a hole above your ‘goodie store’, give them a good drink (say a coffee mug of water per plant) and spread a layer of mulch around them to keep weeds at bay – this will also be useful in keeping moisture in the soil.
Maintain
Celery needs regular and constant moisture to grow to its turgid magnificence, if the weather is dry then you want to provide about a watering can of water per three plants every day. Remember, even when it is raining it has to be wet enough to soak about a hand’s length down into the soil for it to be useful for these thirsty plants. To help the whole process along you can use a liquid feed every two weeks at a rate of about a watering can per three plants. As plants grow and stems begin to strengthen you can mound straw along the outer edges of your paired rows to help shade stems and keep them tender. This also further holds in moisture which, during the final month of growth, is important as this is when most of the stem growth takes place.
Celery can be susceptible to leaf spot and blight in humid weather. Feeding with liquid seaweed is said to help in prevent this. Remove any affected foliage and treat plants with Baking soda spray.
Harvest or pick
You can pilfer outer stems when they are tall enough and thick enough to warrant eating. Just bend away from the plant – without rocking the plant and putting pressure on the shallow roots – until they separate from the stem. Best to harvest when the stems are at least a hand’s length in height. This does depend on variety as some get really tall. Lift the plant carefully from under its roots with a fork and then trim roots off before storing – or eating.
Allow a few plants to flower and they will attract useful predatory insects – such as hoverflies – into your garden.