




Tomato
Grow
Lycopersicon esculentum
Tomatoes are a top vegetable for getting kids into gardening thanks to their delicious, mouth-watering rewards. Smaller cherry varieties never normally make it from the vine to the table in our house thanks to our team of hungry poachers.
Tomatoes are one of the most important vegetables in the Western diet thanks to the quantity of vitamins they supply – particularly vitamins A and C. Tomatoes also contain Lycopene, a potent anti-oxidant, high intakes of which are linked with a reduced risk of prostate cancer. Lycopene is also said to help protect the skin from UV light damage which suits the industrious gardener who finds themselves outdoors for many hours during summer – the calendar’s prime growing season.
In a nutshell
- Full sun
- Fertile soil
- Often needs support
- Good in containers
- Great for kids
Quantity
- 1 plant per person
Companions
- Marigold
- Basil
- Parsley
- Onion
- Garlic
- Shallot
- Carrot
- Lettuce

The growing lifecycle
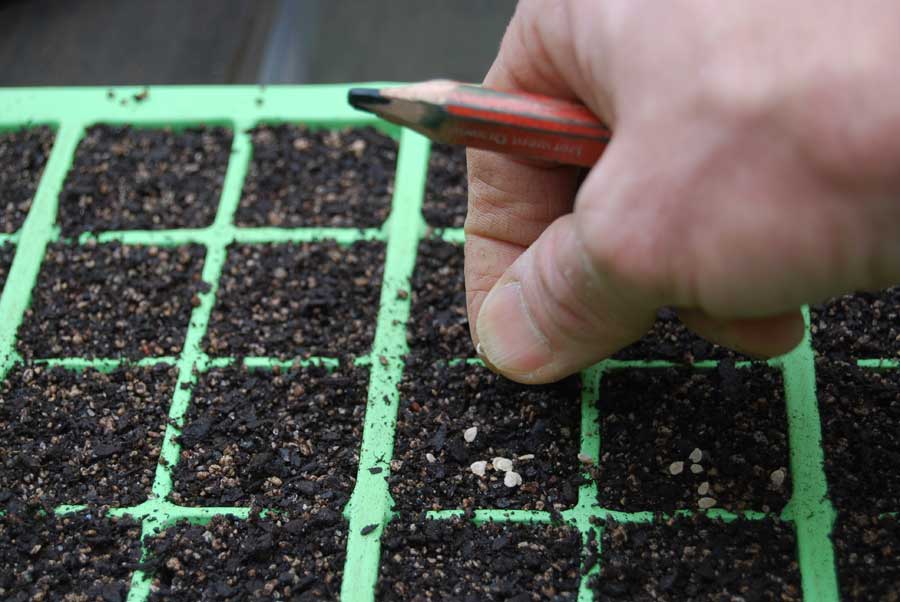
Sowing tomato seeds into a tray of cells
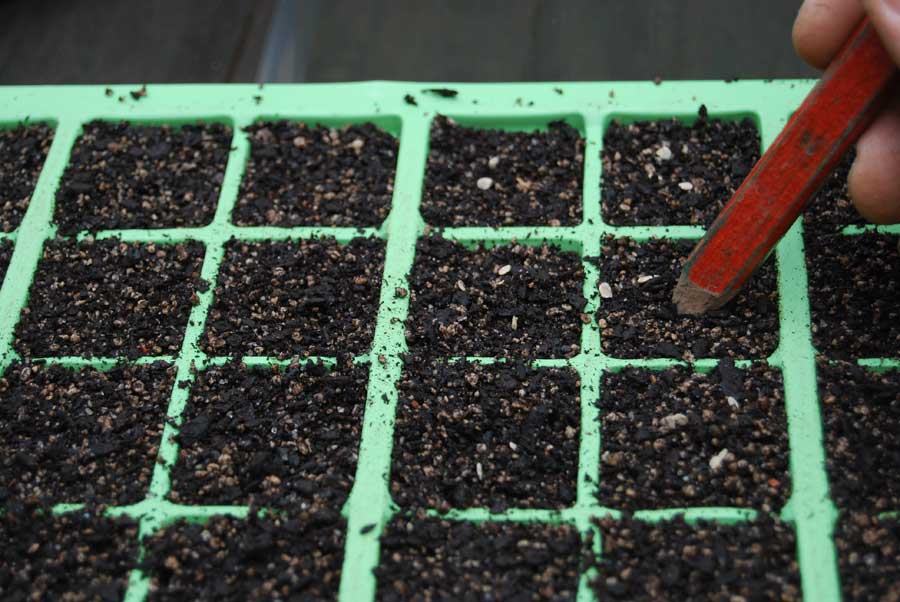
Seeds should be pushed just beneath the surface of seed raising compost

Place seeds in a propagator if you have one or under cover on a warm windowsill

When seeds germinate pinch out the weakest so you have one strong seedling per cell or pot

Carefully transfer seedling into a pot to grow on for a few weeks before planting out later

A healthy looking seedling ready to be transplanted to its final growing place

A newly planted seedling already putting on strong growth out in the garden

Tying stems to supportive bamboo cane - here using old cabbage tree leaves
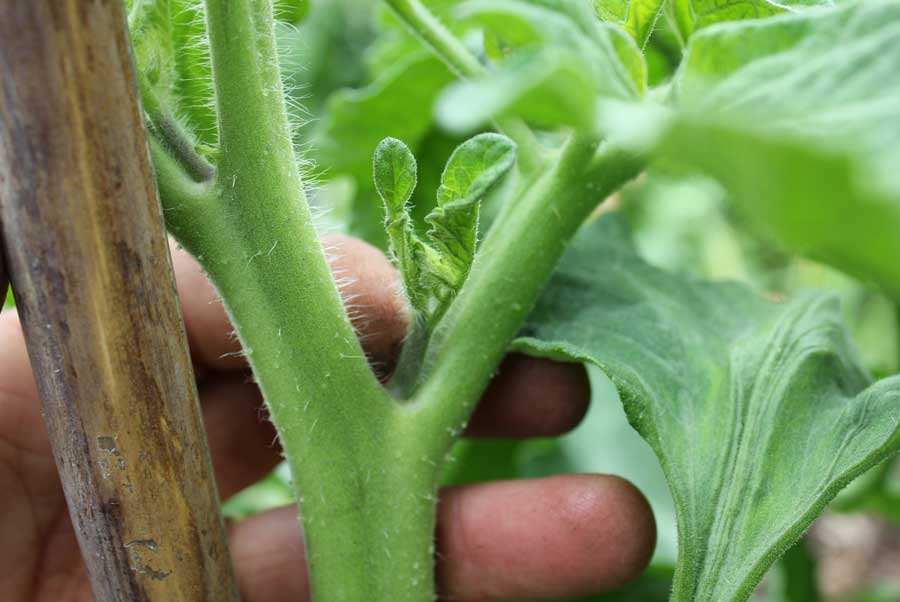
Look for lateral shoots on plants grown as cordons. These will appear on the upper side of leaf joints with the main stem

Remove lateral shoots by gently pushing over to one side until they snap off

Lateral shoot removed
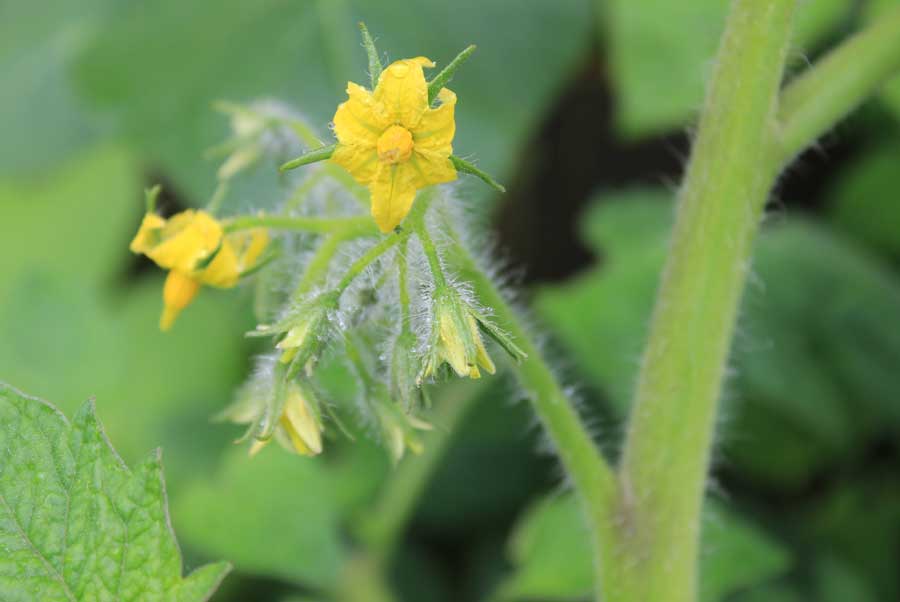
A truss of tomato flowers

Top 7 varieties
1. Cordon/Bush
It is important to be aware of the distinction between Cordon and Bush tomatoes varieties when navigating seed catalogues online or at the garden centre. Cordon plants grow much taller with shorter perpendicular stems known as 'trusses'. These guys need strong supports to grapple with and require more maintenance. Bush varieties are much shorter with fewer but longer trusses that can produce several chains of fruit. They require less upkeep and grow better in windy gardens.
2. Moneymaker (cordon)
Moneymaker is a very popular variety with heaps of medium-sized red fruits that are very versatile in flavour, working well for most recipes. It does well in poor soils and is resistant to disease.
3. Sungold (cordon)
A cherry tomato with yellowy-orange fruits on long trusses. Incredible flavour and a high yield.
4. Beefsteak Big Daddy F1 (cordon)
An old-fashioned tomato with large fruit and irregular shape. Fruits can weigh up to 250g with a meatier taste. F1 hybrid has been developed for growing in Northern Europe. Good disease resistance.
5. Gardeners Delight (cordon)
An old favourite. Fast growing and heavy cropping cherry variety with a very sweet, fresh and tangy flavour.
6. Tommy Red Alert (bush)
A bush tomato that produces a heavy crop of small, red plum sized fruits. Very early harvest which means it can be done and dusted before Blight turns up in late summer. Needs no support, ideal for growing in tight spaces.
7. Tumbling Tom Red (bush)
A bush cherry tomato variety with great flavour and abundant crop. Perfect for all containers be they pots or hanging baskets.
Getting started
When
Tomatoes are sown in sunny spots indoors from March to April. The windowsill is a good spot to start them off. They are then transplanted into greenhouses or outside in the elements after roughly five weeks.
Where
Assuming the weather conditions are on your side choose a site that gets plenty of sun and has adequate air movement to prevent dampness that can cause fungal attack. If these conditions are to be found in your vegetable garden then all well and good but make sure that tomatoes have not been grown in the same location in recent years to avoid increased risk of diseases such as blight.
Soil
Tomatoes are ‘gross feeders’ which means they are like hungry teenagers most of the time. They need a soil that drains freely and does not hold onto moisture for more than about a day and has been well dug through with rich rotted compost.
Sow & plant
Sow
Sow your seeds as deep as they are wide (so pretty shallow) in a loose, free-draining compost, spread out in a seed tray or in punnets and water carefully with a gentle spray rather than a torrent. Once seeds have germinated (usually within 10 days), water carefully for about a fortnight until they have formed two true leaves (the cut-edged tomato-looking leaves that will appear after the initial seedling leaves have developed). The seedlings are now ready to be transplanted into separate small pots around the height of a coffee mug and grown on until they have reached the same height as the pot they are in. They should then be large enough to go into the garden. This will normally take about four or five weeks in total if all goes well.
Choose your varieties based on suitability to your local area and conditions – qualities such as tolerance of humidity or tolerance of lower temperatures can be important factors. Look on the back of seed packets for details or ask the people you are buying them from. There are great varieties to try – from huge ‘Beefsteak’ to diminutive ‘Sungold’ all of them lip-smackingly good.
Plant
Traditionally tomato seedlings are planted from mid May onwards and whilst this can be brought forward in warmer areas – or where a greenhouse is handy – care should be taken in colder areas to ensure all risk of frosts has passed before planting outdoors. Seedlings should be spaced about a full arm’s length apart and can be planted deeply so that soil is pushed up against their stems – to just below the bottom pair of leaves but not over the leaves. Push in a sturdy bamboo cane – about 6 feet high – just behind each seedling for support. This is particularly important for cordon varieties although bush tomato plants can require stem support once they are fruit laden.
Tomatoes can be grown in pots which means you can position them where your garden will offer them the best growing conditions. You can also grow them in bags of compost that are enriched with a slow-release fertiliser. Make about 10 holes with a medium-sized screwdriver in the under side of the bag for drainage and lay it flat, next cut a square – about a hand’s length by a hand’s length – from the middle of the upwards facing side through which you can plant your seedling (best to do one or two seedlings per bag depending on size). Small cherry tomato bush varieties can even be grown in hanging baskets which harks back to their early days as ornamental oddities.
Maintain
Support
As your tomato plants grow, tie them carefully onto bamboo canes to support their stems. Jute ( a soft garden string) is often used but you can also get foam-covered wire and elasticated cord from garden centres that is designed specifically to do the job. These important ties should be supportive but not so tight that they squeeze and damage the stems. Tie round the cane first and then round the tomato stem away below leaf joints. You can buy spiral metal poles which the plant stems just slot into as they grow – this does away with having to tie-in.
Laterals
This bit of maintenance is an absolute must for cordon tomatoes. Plants will head upwards and produce trusses straight off the main stem. In the upwards-facing ‘armpit’ of these trusses that marks their junction with the main stem you will see lateral shoots developing. These should be pinched out whenever they appear (preferably on a dry day to ensure a quick seal of the damaged tissue). The flower heads appear straight from the main stem. Usually the top of the plant is pinched out after four or five flower trusses have been produced to focus the plant’s energies on producing and ripening fruit.
Air-flow
Good ventilation, removal of any damaged foliage (on a dry day) and regular watering are all important factors in producing a good haul of healthy fruits. For this reason leaves on cordons are stripped from the lower part of the stem beneath the first truss to develop. As a general rule, cordons need much more watering and feeding than bushes.
Feed
As soon as flowers develop into small green fruits you should start feeding your plants. Give them at least half a watering can of liquid comfrey, seaweed or worm juice every week for cordons and every fortnight for bush tomatoes.
Troubleshoot
As plants become laden with fruit there can be a rush to get fruits ripe before plants and fruits succumb to a range of assaults. On a dry day remove excess foliage that is shading trusses of fruit so that they are exposed to more sun. Do this carefully and confidently – push leaves sideways at their base and they should snap away from the stem. These surplus leaves can be used to make a tomato leaf spray for use on aphids attacking other plants. Green and black Shield bugs may turn up in numbers and start eating holes in fruits. These can be removed by hand and disposed of in the cool of the morning before they become too agile.
Thrips, Aphids and Whiteflies
All cause leaf damage and can spread fungal diseases such as blight. Treat any visible infestations with Neem oil, Garlic oil spray or Tomato leaf spray.
Potato and tomato blight
This is a serious problem for tomato plants and rapidly destroys plants and fruit. Fungal spores are carried through the air and are particularly prevalent during warm and humid weather – common towards the end of summer when tomatoes are ripening. Plants at most risk are those where foliage has not been controlled by pinching out laterals during the time leading up to fruiting – this reduces air flow around plants and creates ideal conditions for blight to take hold. If you notice brown, freckle-like patches appearing on leaves with a whitish or yellow halo around them and dark brown patches on stems then your plants have blight. There is not much that can be done once an infection is spotted – apart from a swift harvest of unaffected produce, removal of whole plants and sanitary disposal of all foliage in household rubbish. If you add infected foliage to your compost heap you will spread infectious spores through your compost. It may be that long-awaited bottles of home made tomato sauce have to be replaced by jars of green tomato chutney instead. Avoid planting potatoes or tomatoes in the affected area for at least couple of years.
Harvest or pick
You should have some fruit to harvest from July, perhaps a bit earlier if you are growing cherry tomatoes. Twist the red, ripe fruit so that they come away from the stems easily without tearing or dislodging other ripening fruit. On a warm sunny day there is nothing better than a sweet, succulent tomato straight from the plant. A good harvest year should provide a steady supply of fruit into autumn. At the close of the season, when foliage starts to curl and shrink, if there are still fruit on the plants then they can be cut at the base and hung upside down under cover to ensure all remaining fruit finish ripening.